Turn Chat Sign-in Off by Default on Facebook


Hello visitors, I'm once again with a new simple but interesting Facebook trick. It's true that we do spend lot of time on Facebook for chatting with our friends and relatives but sometimes we can't stand endless chat when we're browsing our status update, Today I'm sharing this another cool trick to turn off chat when you sing-in by default.


How to turn off chat by default on Facebook

Just follow these simple steps,

1. First off all login to your Facebook account.
2. Here you will find setting icon from the right button on Facebook, Image refer below,

How to turn off chat by default on Facebook

3. If you wish to turn off chat for all friends simply click on "Turn off chat"
4. If you want more advanced option for turning off chat then click on "Advanced setting"
5. When box will pops-up you will see the options below,


6. Here you will see these three options 
  • First option is turn on chat for all friends except (In the box below, you can type the name of the people whom you don't want to chat)
  • Second option is turn on chat for only some friends (In the box below, you can type the name of those some people whom you want to chat)
  • And the third option is turn off chat for all friends.
7. Select one of these three options and click on save.

I hope these trick help you to make the better your Facebook experience.

How to See Who's Unfriended You on Facebook


When your friend count goes down on Facebook you are not sure to who went missing because Facebook will never tell you that who unfriended you, Would you like to know that how to find who unfriended you I've with a simple plug-in for Internet explorer, Firefox, Chrome, Opera and Safari, Using this plug-in you will be able to see who unfriended you, you can also able to check who ignored your friend request and who deactivated their account via notification.
How to see who unfrinded you on facebook

Adding Unfriend Finder Extension


1. The extension can be available here with full installation guide. If you are using Google Chrome, it will install automatically but In the latest version of Google Chrome you can't install it directly because recently Google changed the way to add extensions that are not in the Chrome web store to your browser. So, to install it follow these steps,

  • Download the extension file from the website and save it to your PC
  • Now on chrome go to Tools > Extensions
  • Locate the extension file on your computer and drag the file onto the Extensions page
  • When dialog box is pop-up click on Install
If you are using Mozilla Firefox, You will have to first install the Greasemonkey- add on, after adding Greasemonkey you will be able to install Unfriend Finder script.

2. After installation is finished you need to restart your browser
3. Now go to Facebook and log-in to your account 
4. On the top right menu you will see one more tab which is "Unfriends"
And one more option "Unfriends" in your favorites list.

Advantages of this plug-in


Unfriend - When someone unfriends you a numbered notification will appear above the unfriends tab it also provide the date and time you were unfriended.

Deactivations - It will also alert you when someone deactivated and reactivated his/her profile.

Friend requests - It will show your pending requests, and give you info on who ignored or cancelled your request.

Having any problem then leave your comment below.

if you like this tip then plz like our facebook Page Blogging State

New Facebook Chat Codes: colored chatting

Facebook logo EspaƱol: Logotipo de Facebook Fr...


Now on Facebook you can type anything in colored characters. Facebook recently made changes to it's chatting feature, Facebook provides some codes to type anything in color, Just copy any characters code You like to write and paste them in your chat box and click enter and colored character will be displayed.

New Facebook Chat Codes


Codes of A-Z 

Below are codes of A-Z which you can use in Facebook chat. You can create your on words with this codes.

[[107015582669715]] = A
[[116067591741123]] = B
[[115602405121532]] = C
[[112542438763744]] = D
[[115430438474268]] = E
[[109225112442557]] = F
[[111532845537326]] = G
[[111356865552629]] = H
[[109294689102123]] = I
[[126362660720793]] = J
[[116651741681944]] = K
[[115807951764667]] = L
[[106596672714242]] = M
[[108634132504932]] = N
[[116564658357124]] = O
[[111669128857397]] = P
[[107061805996548]] = Q
[[106699962703083]] = R
[[115927268419031]] = S
[[112669162092780]] = T
[[108983579135532]] = U
[[107023745999320]] = V
[[106678406038354]] = W
[[116740548336581]] = X
[[112416755444217]] = Y
[[165724910215]] = Z

How to Use Above Codes

  • Wanna create hi . So pick up codes of H and I .
  • Which is [[111356865552629]]  [[109294689102123]] 
  • Make sure there is space in between any two codes or else it will not work.

    If you can like this post then please like our Facebook page Blogging State
    Enhanced by Zemanta

    How To Expand Widget Templates in New HTML Editor

    Image representing Blogger as depicted in Crun...


    After the launching of New HTML Editor , Every One is Confused What To Do? How To Use New HTML Editor ? It's Quite Simple and easy,but One Question which mostly I saw in Comments was How To Expand Widget Templates in New HTML Editor? It's Not a big Deal But Let me clear it first What is Expand Widget Template? Actually "Expand Widget Templates" was an option in Old HTML Editor.By Default Old HTML Editor only shows the core code and hides the widgets Code,By Enabling this Option You Can easily Edit any Blogger Template.All Template Core Code along-with Widgets Code will be shown when you check "Expand Widget templates" Option.

    Where Is Expand Widget Templates

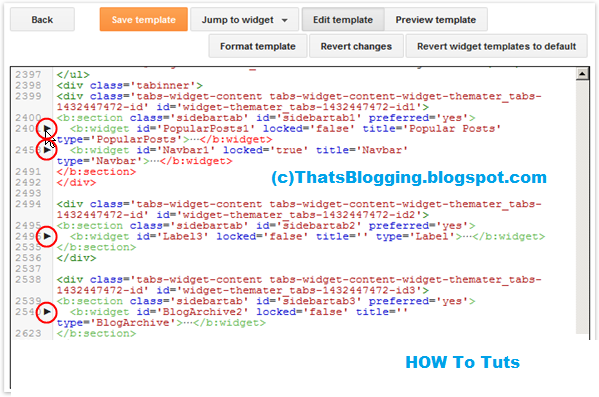
    There is no Option for Expanding Widget Templates in New HTML Editor.Because All the Codes have been shown in the New Editor,that's why You Don't Need to Expand that Code any more.In New HTML Editor all widgets have been folded,A Widget Code Section which has been folded is identified by a bold fold marker i.e arrow symbol ?,near next to the line Number.Whenever You Click on this Arrow symbol ,the concealed widget code section is revealed.
    New-Html-Editor

    How To Expand Widget In New HTML Editor

    As we mentioned above there is no option to expand the templates in New HTML Editor however the Code has been folded and we can easily reveal that code just by Clicking the arrow mentioned above.

    How To Search For A Specific Section

    It is very Simple to search for a line , tag or any word in new HTML editor.First of all Click between the Code/Script of Template>>Now Press CTRL+F >> A Box will pop-up at Top right side>> Enter the desire text , tag or any character you want to search in the template Coding.Moreover if the Tag is in folded Code,by searching it will automatically reveal from concealed widget.

    Directly Go To Widget Code

    You Can Directly jump to a widget Code in New HTML Editor.All You have to do is use Jump To Widget feature to easily and quickly locate the desired location/Code.After finding the widget Click on ? to expand the widget before editing.
    So What's Up: Still Confuse in Using New HTML editor? Ask Any Question Freely,we are here to help you in any Problem,Stay Blessed,Happy Blogging!

    Enhanced by Zemanta

    Stop Your Image Stealing Using Jquery


    Consider, you are working hard in creating images for your webpage and someone just copy and paste on their webpage without any credit or appreciation, then how would you like to feel? In today's post, here is a important trick for every blogger or webmaster to stop your Image stealing. You just have to put a little piece of code in your template which will prevent users to copy Images from your web page.
    Stop Your Image Stealing Using Jquery

    How To Stop Your Image Stealing ?

    • Go to Your Blogger Dashboard > Template > Edit HTML.
    • Take a backup of your template.
    • Now find for <head> in your template
    • Add below code just above/before <head>
    <script src='http://ajax.googleapis.com/ajax/libs/jquery/1.7.1/jquery.min.js' type='text/javascript'/>

    Note - If your blog have already a jquery plugin then ignore this step.

    • Now again find </head>
    • And add below code just above/before </head>
    <script type='text/javascript'>
    //<![CDATA[
    $(function(){
    $(".post-body img").after("<img src="https://blogger.googleusercontent.com/img/b/R29vZ2xl/AVvXsEgC38RCkIRxVopkiSZXkWcLQiHgN21G3VPuvWVDGkk2i4DvZ4GJTAt4LUI8LPmPYhUUhCHZmziQZXuSP6SCElLCYm4N3jGXAPW6zrAcQOBagBjKVY_BehE_ONR5jiEjOVXbU4g0pzCaRRXV/s1600/Stealing-Detected.png" alt="Blogging State Stealing Detected" style="margin-left: -212px; opacity: 0; position: relative; top: 0;" />");
    });
    //]]>
    </script>

    I hope this small trick will surely help you to prevent your Images from republishing on other websites.

    Enhanced by Zemanta

    How To Add Border To Blog Header Using CSS


     Add Border To Blog Header Using CSS:
    Assalamualaikum Friends , after a long time i am back in Blogging , actually i was busy in 2nd Grade studies and now it's going to end !! Hope you all are fine , here is a small trick via which you can add border to your blog header with the help of CSS.Actually it's not a big or smart trick but some people are waiting desperately for this trick! If you are One of them here we go ! You will think how it will looks like? So , take a look on the below snapshot which has 24px cyan color border.And for live demo , take a look on our Blog header.

    How To Add Border To Blog Header Using CSS

    • Go To Blogger Dashboard
    • Click On Template
    • EDIT HTML
    • Search For "header" and find out "#header-wrapper {" this CSS Code
    • Now below { and above } type border: style pixels color-name  as shown in the below snapshot
    •  Now Save the template and that's it :)
    • You Can Change the Style to dashed , dotted , groove or any style and pixels to your desired no and color to your desire choice!
    So What's Up : Actually developers will laugh , but i know many People like this trick and they don't know what to Do and How To Do? But i am here for you guys , if you have any problem you can ask freely , i will help you in any problem . Stay Blessed , Happy Blogging!

    Create Some Fake Computer Viruses

    Step 1 Studying

    Today I am sharing another interesting article about "How To Make Fake Funny  Computer Virus". In this tutorial I teach you how to make a harmless and fake virus, Basically what it does is just log off and then "Shutdown" your computer.
    Disclaimer - Everything here is for informational purposes only.

    1. Fake error message

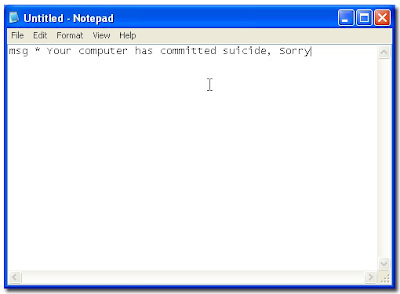
    Step-1 Make a new text document with notepad, type msg * YOUR MESSAGE, image refer below:

    Type your fake massage

    Step- 2 Now save as Play me.bat As always, make sure that you select All files instead of Text Document.


    Here's how it will look like once it is launched:

    Fake error message

    2. Forced Shutdown

    Step-1 Put the following into your Notpad:

    @echo off
    shutdown -s -f -t 60 -c "YOUR MESSAGE HERE"

    (Replace 60 with the length of the countdown you want)

    Step- 2 Now save as play me.bat

    Here's how it will look like:
    Fake forced shutdown
    To stop it, open Run from the start menu and type shutdown-a. Enjoy
    Enhanced by Zemanta